Friday, October 2, 2015

Prayer for our daughter


After finding out that I was pregnant we definitely felt like we were flying blind - we didn't know so many things, including the health or sex of our baby. I was comforted by 2 Timothy 2:19, knowing that our foundation in God's word was firm & that our baby was known by God.

I prayed and still pray over our daughter's body - for her physical health, but I also pray the prayer below as well.

I don't want her to have better things than I had, I want her to have better values.  We will never know what the future holds for her but we can rest in knowing that God's plan for her life is far above what
we could imagine & she can be strong & courageous because His faithful love for her will not fail. Jer 29:11, Deut 31:6


-Our prayer-
----------------------------------------------------------------
Feet that stand firm in their beliefs
Legs that walk with purpose in their calling
A backbone that upholds what is just
Arms that reach to those in need
Hands that hold with strength and love
Lips that speak words of wisdom tempered by compassion and grace
Eyes that see the good in every situation
Ears that hear Your voice above the chaos in this world
A mind of understanding & a heart that beats fervent and faithful
----------------------------------------------------------------
The Creator's love for us is deep, unapologetic, consuming and powerful leaving no place for fear, doubt, guilt & anxiety, may we find peace in his compassion and faithfulness to us.

God bless you,
~D & H

Friday, September 4, 2015

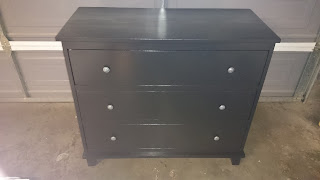
Refreshing the Look of Bedroom Furniture for Under $50

While D was remodeling our master bedroom I decided that a fresh coat of paint may be a great solution to updating our bedroom furniture to go with the new vibe.

Master bedroom before - when the house was originally listed
Master bedroom after the remodel
Gorgeous right? Although painting the furniture was such a tiny piece of the overall remodel, it was definitely a necessary touch - ideally the furniture in the room should take no attention from the craftsmanship. 

Updating the furniture to be black seemed like the way to go so I bought some paint, a paint brush, painting tape, borrowed D's palm sander and went to work on it.

Here is what one of the dressers looked like before


I chose a high gloss finish paint from our local Home Depot, the quart was enough paint for two dressers and a nightstand.
I also bought this paint brush, also from Home Depot. 

To prep the dressers and nightstand I sanded them using a palm sander. 
I just sanded until the shine was gone, like the drawer on top in the photo below. 
I used a damp cloth to remove the dust and taped off any areas that I didn't want to get paint on. 
I then painted two coats of paint along the grain of the wood. Voila.

I did the painting after I got off work and on a weekend so overall the project took me about a week to knock out.

I like using black in our home, it feels very grounding to me. Obviously the focus of our room is not on the furniture at all, but it shouldn't be! 

I am really happy with how the room came together and how beautiful our refreshed furniture looks in it! 
~D & H


Wednesday, September 2, 2015

Baby Booties: Easy Knitting Pattern

I found this easy knitting pattern for baby booties & just had to try it out.

This was the first time that I have used markers for a knitting project and it was not as difficult as I thought it would be, I am definitely going to make a pair of these as a gift for my next expecting friend!

Each of the pairs I made took me only a few hours, can't wait to see them on my baby's little feet!


The pattern can be found here: Baby Booties Pattern

Happy knitting!
~D & H

Sunday, August 30, 2015

Chocolate Chip Cookies

In high school after our hockey games I would bring these cookies for our team, we never won a game & really were the worst team you can possibly imagine. D always came back for more cookies, he kept eating them, I kept baking them and eventually kept him too.

Now I'm not saying these cookies will get you a husband, but...

This recipe is really my go to for any event - from stress baking to potlucks to surprise company, nothing is as sweet & welcoming as homemade cookies. They are like the little black dress of desserts if you will; a classic & a guaranteed win.

The recipe is simple, and here it is:
3/4 C Sugar
3/4 C Brown Sugar
2 Eggs
1-1/2 TSP Vanilla
1 C Butter Flavored Crisco (you can use butter instead)

2-1/4 C Flour
1/2 TSP Salt
1 TSP Baking Soda
1 C Ground Oats - Regular or Quick Oats

2 C Chocolate Chips


Ah the goods. Preheat the oven to 375.

Put the sugars, vanilla, eggs & Crisco into a bowl.

Mix.
Put the oats in a blender and crush them. They should look like this. The ground up oats are what keep these cookies from being flat, this is my "secret" ingredient (if you can call it that).
Now mix the flour, salt, baking soda & ground up oats.
Some people use a separate bowl for the wet & dry ingredients, I need less dishes in my life so I don't do that noise. 

Mix all the ingredients together.
Add the chocolate chips. 

Mix it all up and drop globs of cookie dough onto your baking sheets (I use air bake sheets), don't roll the cookies, it's a waste of your precious youth.
Bake for 8-10 minutes, or until they look like this:
They should look a little gooshy in the middle. Let them sit on the pan for about ten minutes before moving them to a serving platter.

Here they are!
Happy baking (& eating too!)
~D&H

Wednesday, August 26, 2015

Bringing back the casserole!

To help prepare for our new addition, I wanted to create a few dishes that I could freeze & bake later. A great casserole seemed like the way to go. Now we've all had our bad experiences with casseroles, believe me I've been there, the last one I had was in the 90s and involved tuna (ew!), but this is not that kind of casserole.

I also had a few random items in my cabinets & fridge that I wanted to get rid of, like leftover blah salsa from a party. So this dish is the result of that - kitchen cleaning & nesting.

The first recipe today is for the Sopa de Arroz, or Mexican rice. This is how I make it and on the scale of authentic, it's not. It's just easy and good. The next recipe is for enchilada sauce made from salsa that I wanted to get rid of, turned out delicious! The last recipe is for the actual casserole. Casseroles are forgiving like soup so just take out the ingredients that you, your spouse or kiddos don't like and add ones they do. Okay, here we go!

For the rice:
2 C of white rice
2 TBSP Caldo de Tomate (think of it as tomato boullion)
2 TBSP Olive Oil
~4 C of water


Heat the oil in a saucepan and add the rice, stir the rice to coat with oil.
Brown the rice. BTW, you can't skip this part.

Add the water and tomato flavoring and bring the mixture to a boil.
Once boiling, give it a good stir, cover it, reduce heat to low and let it cook ~20 minutes. Confident cooks will just leave it the entire time....I'll typically check the rice once and give it a stir to make sure there is enough water because dry rice is nasty. I typically use about half a cup more of water per serving than the rice package says to.
Done.

Now for the enchilada
sauce:
Salsa
1 TSP ground cumin
1 TSP Paprika
1 TSP Cayenne Pepper
2 TSP Chicken boullion
Water
Dump equal parts water and salsa into a saucepan on medium low heat. I used two cups (ish) of each.  Add all the spices. 

Use a whisk to mix. Allow the mix to come to a gentle boil. Stop and smell your kitchen, inhale...exhale. Ahhhh.
Okay, that is done. 

For the casserole:
10-12 tortillas
1 can of beans (any kind) 
1 can of corn 
1 can of olives 
3 cups mozzarella cheese 
Mexican rice
Enchilada sauce 
Heat the oven to 375.

I used a round (12 inch?) dish for my casserole. Start with 1/4 cup of enchilada sauce in the bottom of the dish. Place three tortillas around the bottom of the dish for structural integrity and sprinkle about a cup of the rice on top.
Now add about half of each of the remaining ingredients and cover with cheese.
Pour a cup of the enchilada sauce on top. Place three more tortillas in the pan and repeat the previous steps. I only did two fat layers on mine since my pan isn't that deep. For the top layer layer three tortillas around the top of the casserole and add about 1/2 cup of the enchilada sauce. 
Cover with foil, place on a cookie sheet (so nothing spills over into the bottom of your oven!). 
Bake covered for 25 minutes. Remove the foil and bake another 15 minutes. Let it sit for 10 minutes before serving. 

Cut a huge slice & top with sour cream. Enjoy! 
The casserole is back guys! 

Happy cooking! 
~D & H


Tuesday, March 31, 2015

Cheap Frill - Spring

I found this charming bucket for $10 at an antique store in Roseville, CA (if you're in the area and want to check it out the map is here), they were also selling fake lavender bushes for $15 each but that just seemed crazy to me. I clipped a few of my lavender bushes in the backyard & voila ten bucks well spent for some added charm!


Always fun when yardwork/playing in the dirt turns into an opportunity to decorate! 

Hope your spring is sunny & calls for a little playtime in the dirt! 
~D & H

Friday, February 20, 2015

Russian Tea

Here at D & H we like to share. Unfortunately these past couple of weeks that included sharing a cold.  Hello cough drops & Kleenex.  Goodbye sweet sleep.  

My mom used to make me and my siblings a special drink when we were sick, she called it Russian Tea.  A while back when I Googled it I was surprised that it was actually a thing, honestly I thought it was something she just made up, similar to "the crust of the bread has all the nutrients".

Anyway...I thought I would share our favorite drink to sip on when a cold finds its way to our house.

For the mix you will need:
1/2 Cup Instant Iced Tea Mix
1 Cup Tang (orange beverage mix that's not just for kids!)
1/2 Cup Sugar
1 Tsp Ground Cinnamon 
1/4 Tsp Cloves 

I typically go a little heavier on the cloves, but that is just my taste.  This mix is really forgiving so if you overdo it on the spices, just add a little more Tang & iced tea mix to mellow it out. 

I store the mix in a tin and use 2ish tablespoons of mix for each 12 oz cup of hot water. 


Next cold season I plan to make extra mix in Mason jars & give it to friends. 


There it is...hot, sweet, tangy relief!  We hope you're staying healthy and warm this week! 

Best
~D & H


Saturday, February 7, 2015

Junk In The Trunk

The paperwork involved with being a grown up is overwhelming.  I know I shouldn't call paperwork junk, but when it piles up on my desk, it sure feels like junk!

After purchasing our home last year we noticed that our file folder box just wasn't cutting it anymore.  D found an amazing trunk at a garage sale for $10 and after seeing an idea post on Pinterest we decided to turn the trunk into a file cabinet.

Here is what you will need and how we did it:
1 trunk/chest
2 boxes of hanging folders
tin snips 
hot glue/hot glue gun 
2-3 large cardboard boxes 
a box cutter (I used scissors and it was such a hassle!)
SOS pads 


We bought two boxes of hanging folders.
We set up the file frames inside the trunk.  


D used tin snips to cut the frames to size.  (This step we should've done last since we had to resize them after I finished the interior.)  


I used cardboard boxes cut to fit the top/bottom/sides of the trunk as rigid backing pieces for the interior fabric, this also helps to get a cleaner finish for the edges.  


I then used hot glue to attach the fabric to the backing pieces.     


Doesn't look to impressive yet eh? 


I ended up using one fabric for the sides of the trunk and a different one for the top and bottom because I ran out of the first one!

At this point you can see on the upper right where my kindergarten cutting skills failed me and I had a noticeable gap. 


Black paint to the rescue!  I painted the rim of the trunk black, which you can see from the photo above was making the interior look unfinished.  

I also painted the gap where I didn't cut the cardboard pieces just right. 


Once the paint dried we placed the hanging folders into the trunk only to find that the lid didn't close, ah!  D had to bust out the tin snips and trim the frames again!

Cool, I think we'll keep it.  Now on to the exterior...


The hardware needed a good scrub, but I definitely didn't want it to look brand new, so I haphazardly scrubbed the metal with an SOS pad to remove the rust and the gunk, without removing all of it.


Good enough for government work.

So there it is, our beat up little trunk.  Now to put the junk in the trunk.      


I have to say, I'm obsessed with steamer trunks, they just have so much character!  My first steamer trunk came from an antique store in Moss Landing and my second one I found abandoned on the side of the road, jackpot! 

There are pros who restore these beauties, this particular website shows how they do it too!  If they saw what I do to mine, they would probably scream in horror, but to me making it functional is making it valuable. 

Hope you all have an inspired week and find things that add value to your home! 
~D & H