Wednesday, March 1, 2017

Scriptures of Encouragement: Career

There are always going to be seasons in life where our work is challenging - regardless of whether that work it is at home, in an office, at school or online.  For many of us these professional challenges are coupled with the responsibilities of raising children, cultivating a healthy marriage, maintaining family relationships and managing a household.   

I rely a lot on routine to maintain harmony between the different areas of my life, but often that routine is disrupted by life.  Thanks life!  When that disruption happens the way I typically react is by working harder - staying up later, putting in more hours, picking up the slack, etc etc.  The idea of slowing down to "wait" on God is not normally something that occurs to me.  


But if faith really is the foundation of my life, why is my first instinct to rely on myself and what I can do rather than to rely on God and what HE can do?  

If my focus is on God and the plan he has for my family, on days when there are setbacks, or when I can not find joy in the day-to-day aspects of my work or when I am simply just tired, I can rest and rely on God.  I know that He has a purpose for my life, so I will apply whatever intellect and talent he has given me towards the work I have been called to do.  I will focus on God so that regardless of the situation (or my feelings towards it) I will remain faithful, steadfast and humble in everything I do.    

Below are a few sciptures that encourage me, I hope they encourage you as wellGod bless you, 
D & H    

Joshua 1:9
Have not I commanded thee? Be strong and of a good courage; be not afraid, neither be thou dismayed: for the Lord thy God is with thee whithersoever thou goest.

1 Cor 15:57-58
 But thanks be to God, which giveth us the victory through our Lord Jesus Christ.  Therefore, my beloved brethren, be ye stedfast, unmoveable, always abounding in the work of the Lord, forasmuch as ye know that your labour is not in vain in the Lord.

Psalm 25:1-5
Unto thee, O Lord, do I lift up my soul. O my God, I trust in thee: let me not be ashamed, let not mine enemies triumph over me.  Yea, let none that wait on thee be ashamed: let them be ashamed which transgress without cause. Shew me thy ways, O Lord; teach me thy paths.  Lead me in thy truth, and teach me: for thou art the God of my salvation; on thee do I wait all the day.

Mark 12:30
And thou shalt love the Lord thy God with all thy heart, and with all thy soul, and with all thy mind, and with all thy strength: this is the first commandment.
 
Proverbs 17:27 (NIV)
The one who has knowledge uses words with restraint, and whoever has understanding is even-tempered.

2 Cor 12:9
But he said to me, My grace is sufficient for you, for my power is made perfect in weakness.” Therefore I will boast all the more gladly about my weaknesses, so that Christ’s power may rest on me.
 
1 Peter 5:6-7
 Humble yourselves, therefore, under God’s mighty hand, that he may lift you up in due time. Cast all your anxiety on him because he cares for you.
 
Philippians 2:3-4 
Do nothing out of selfish ambition or vain conceit. Rather, in humility value others above yourselves, not looking to your own interests but each of you to the interests of the others.
 
Titus 2:7-8
In everything set them an example by doing what is good. In your teaching show integrity, seriousness  and soundness of speech that cannot be condemned, so that those who oppose you may be ashamed because they have nothing bad to say about us.
 
Col 3:23
Whatever you do, work at it with all your heart, as working for the Lord, not for human masters, since you know that you will receive an inheritance from the Lord as a reward. It is the Lord Christ you are serving.

Proverbs 3:5-6
Trust in the Lord with all your heart and lean not on your own understanding;
in all your ways submit to him, and he will make your paths straight.


Thursday, January 26, 2017

Lazy & Delicious Tortilla Soup

It is COLD and RAINY here which means there is nothing like coming home to a warm, delicious dinner.  This soup is all that AND it is  super easy. YAY!  


Dump the ingredients below into your crockpot then walk away slowly...

Tortilla Soup
1 can black beans
1 can corn
1 can rotel diced tomatoes  
1 can green chilies
2 cups shredded chicken
1 tsp minced garlic
1 tsp paprika
1 tsp cumin
2 tsp chicken boullion
4 cups of water 

Does it still count as cooking even though I didn't stir anything? Sure, why not.   

I left everything in the crockpot on high for roughly three hours.  

Just prior to serving, I used a pizza cutter on a few tortillas to make tortilla strips for the soup - I threw them on a cookie sheet and baked them at 350 degrees until they turned brown.  I served D's soup with the tortilla strips and a scoop of sour cream. For mine I sprinkled some shredded lettuce and avocado.  Yummo.

Getting warmer!
~D & H  

Sunday, January 8, 2017

Eucalyptus Wreath Rework

I was looking for a winter wreath.  Do I even need to say I wanted it to be simple, classic and cheap?   Well that wreath doesn't exist.  Or at least, not anywhere I looked.  

So I went off to the Michael's sale section to find an okay looking wreath that I could rework.  

I found this messy eucalyptus wreath for 80% off.
Then I went looking for some simple green and white foliage.  
I removed the bow and wretched flowers from the wreath then started to add the green foliage to the wreath attaching the pieces using a hot glue gun. 
Two words I kept in mind while adding the foliage were restraint and symmetry.  This eucalyptus wreath was actually really beautiful on it's own so I didn't want to add foliage pieces that were too bulky, also for a more classic looking wreath I wanted it to be fairly symmetric. 

This wreath ended up costing just under $25 and took me only a few minutes to rework.  We get tons of compliments on it and it smells wonderful. 

Welcome Winter! 
~D & H
 

Truss Bench

My folks used to have a bench at our dining table on which D and I were absolutely NOT allowed to sit next to each other.  On a completely unrelated note, I really wanted a bench for our massive farmhouse table. 

D made this beautiful truss bench using plans from this collaboration by Shanty 2 Chic and Ana White.   The only modification he made was not adding the breadboard ends.  He stained the top and painted the bottom, I just love how it turned out. 


He used Glidden's Pale Pistachio and Varathane's Dark Walnut Semi-Gloss Stain.

This bench gets a TON of use, our daughter uses it as a table for coloring, we've crammed friends and family on there for gatherings and our (very bad!) dog uses it as a easy way to access the table!  This bad boy is as sturdy as it looks thanks to those massive 4x4's.


 If you're looking for a great DIY bench, this is the one to make!
 
Cheers to sitting next to each other and many more great conversations around the table! 
~D & H


Tuesday, January 3, 2017

DIY Laundry Room Shelf Using Old Curtain Rod

We took a little time this weekend to clean, simplify & add functionality to our laundry room.  
 
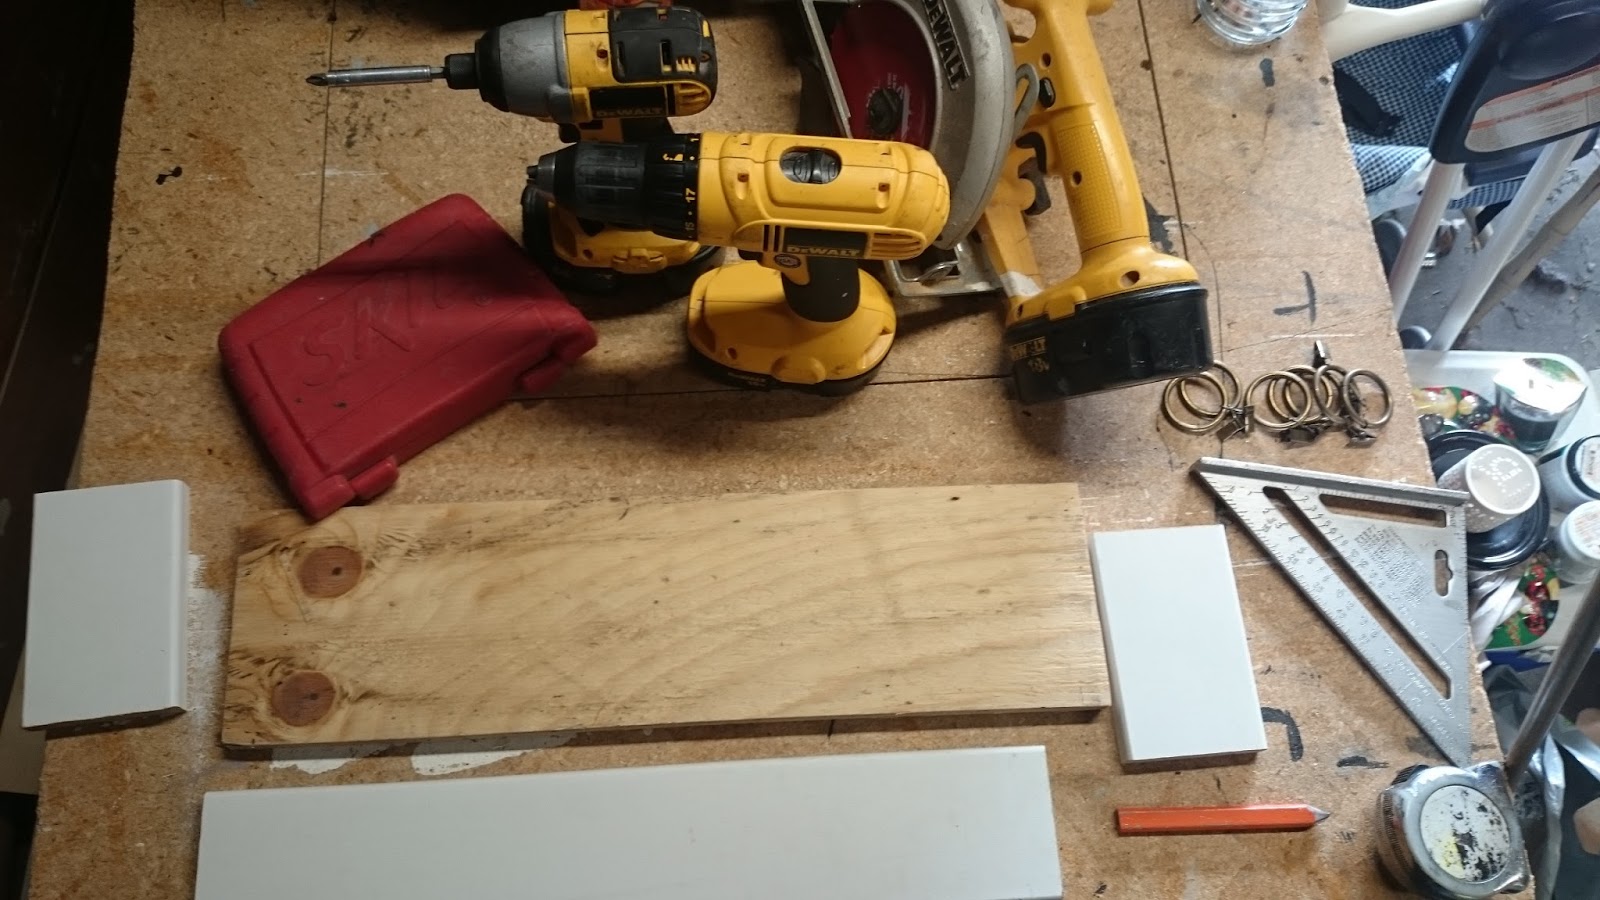
D and I made a little shelf from an old curtain rod and some scrap wood from the garage.  

Now I have a place to keep lost socks, collect loose coins in his Grandpa's old change jar and hang items that need to skip the dryer. 

Here's what we used to make the shelf:

Tools:
Drills
Square
Level
Screws
Counter Sink
Drill bits
Saw
Pencil

Material:
Shelf: Scrap piece of plywood - 21x6 in  (you could also use MDF for this if you have it)
Side Support: Scrap 1x4 MDF trim pieces - 2 pieces cut 6in long
Back Support: Scrap 1x4 MDF trim piece - 1 piece cut to 20in long


Here is how we did it:
 
Step 1
D pre-drilled out the holes to connect the side support pieces to the back support piece of trim

Step 2
Next he marked the location for the holes to hold the curtain rod, these were 2 inches from the bottom of the trim.  


The trick to this step was to keep the rod from going all the way through the trim, he achieved this by only drilling half way through the side support pieces.  

He marked how far he wanted to drill the hole using painters tape 1/2 inch up from the tip of the bit. 
 Then he drilled the holes, stopping when the tape hit the trim.  Brilliant. 

Step 3
Paint.  I used Glidden's Dusty Miller paint color.  

Step 4
Cut the shower rod (20 1/4 inches) 
Step 5
Assemble the supporting pieces - D used 2 screws to attach the first side piece to the back support piece.  Next position the rod, add the hooks and fit the second side piece onto the rod.   He used a mallet to get the rod snugly into the pre-drilled holes. 


Use two screws to attach the second side piece to the back support piece. 

Step 6
Attach the shelf to the support pieces, for us this involved a LOT of banging and finagling. 
Step 7 
Touch up the paint.  For me this included painting a few sides I totally missed.  Whoops. 

I also painted two little signs for the shelf on some scrap wood.
Step 8
Hang the shelf using (long) screws.  

I love how this little shelf turned out, I know it is going to get a lot of use & we always love finding things to build with material we find around our place.  

D also hung curtains for me & we cleaned out some clutter, feels so fresh in our little laundry room - what a great little project to start the new year! 
~ D & H 


Monday, January 2, 2017

DIY Lip Polish

Okay, let's chat about lipstick, kids & husbands.  They don't mix.  Good chat, good chat. 

Now let's chat about that lipstick junkyard you have stashed in your bathroom.  I know, I know, that color was the perfect winter red. I get it.  Even though I like to keep it simple when it comes to makeup,  I have to admit that I have a lipstick junkyard too.  Well, not anymore!  I decided to clean it out and use my old lipsticks to create a lip polish - a non-sticky, super moisturizing, delicious smelling, idiot proof application, gentle pop of color.  

I am very particular about colors and textures so creating my own lip polish lets me get colors that are just right for my skin tone and that are not sticky or goopy.

All you need to create your own is 15 minutes and a few items you can probably scavenge from around your house. 

Scavenger Hunt:
Aquaphor (Vaseline, Bag Balm or A & D Ointment are alternatives)
Chapstick
Baby Wipes
Makeup Brush
Lipstick
Empty Makeup Container 
A small bowl (I didn't use one to mix everything and totally should have)

For mine I used the Candy Cane Chapstick which I absolutely love (it smells delicious!) and I used a Bare Minerals container that previously held face powder.

Start by mashing half of the Chapstick tube into the bowl, then mixing a 1/4 inch chunk of your chosen lipstick color.  Mix together until there are no clumps of Chapstick.


Now add roughly 1/8 teaspoon of the Aquaphor and mix well.  This gives the lip polish a deeper moisture and just a hint of shine. 

This lipstick was a little too brown for me so I used a dollop of a Wet 'N Wild lipstick I had (which happens to have an adorable name) to shift the tone a little closer towards red.  


Mix it until it is smooth.  If you mixed it in a bowl, transfer it to your chosen container and clean the edge of the container with a baby wipe.  Wonderful.  


This little DIY is very forgiving (and ideally it is free), so don't be afraid to mess up or remix the color if it isn't just right, just add more Chapstick or add another lipstick tone until you get a color that works for you.  

A little dab is all you need for moisturized, totally kissable lips. Yay! 


This one below was actually the first one I made, I have no idea what color this is by NARS but my sister gave it to me and I was obsessed with it, but while I was sharpening it one day it broke and I just could not let the broken piece go to waste!  I used that piece for the lip polish below using the same recipe as above, except here the only color I used was this NARS color.  I absolutely love it!  FYI the container is a L'oreal blush cream container.


The color looks intense in the jar but it is really just a gentle tint went applied
So easy, even I could do it! 


This is absolutely my new favorite makeup item!

Now I have one for my purse and one for my car and it didn't cost anything...well, I'm sure it will cost a few kisses! 

Muah! 
~ D & H